Welcome to the StartANetwork Support Center
How Can We Help You Today?
Start Building Your Network Today!
Create your free account with StartANetwork and experience how to grow your community,
connect with like minded professionals, and achieve your goals.
frequently asked question
The FAQ section of the StartANetwork website is designed to provide clear and concise answers to common questions about the platform’s features and benefits. Below is a description of the content covered in this section:
TRAINING ACADEMY
HELP CENTER
KNOWLEDGE BASE
Your ultimate guide, featuring articles and tutorials to help you set up your account, explore platform features, and unlock the full potential of your network.
As a network owner, read these articles with helpful photos to better visualize and understand our platform.
Customization and Configuration
How to set your General Settings Section within your StartANetwork platform
How to set your Navigation Settings Section within your StartANetwork platform
Part 1: How to set your Website Content Settings Section within your StartANetwork platform
Part 2: How to set your Website Content Settings Section within your StartANetwork platform
As a network member, read these articles with helpful photos to better visualize and understand our platform.
Getting Started
How to Install the StartANetwork App (PWA Guide for Android and iOS)
How to Set Up Your Profile Settings with Your StartANetwork Account
How to Manage Your “Find a Network” with Your StartANetwork Account
How to Invite and Join a Network within Your StartANetwork Platform
Features of the Member Directory within Your StartANetwork Dashboard

Simple Pricing for Your Network
Free to Start: It costs nothing to create your own network.
$25 per Member per Year: Members of your network pay just $25 per year. You can choose to let your members pay this fee, or you can cover it for them.
Flexible Payment Options
Include in Subscription: If you charge your members a subscription, you can include the $25 fee in that payment. This lets you focus on growing your network, without worrying about extra fees.
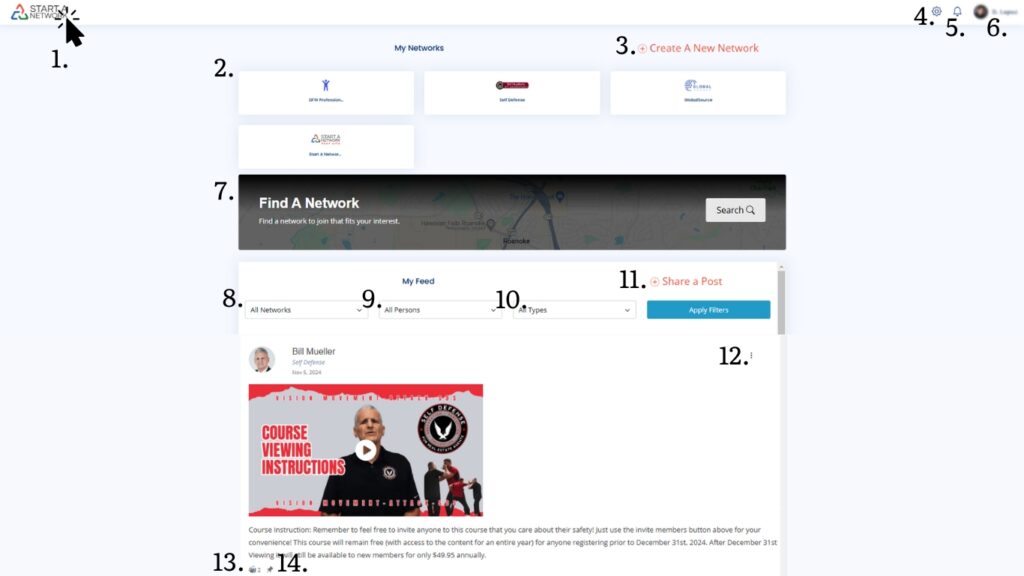
| 1. Network Homepage Button | Click this button to be redirected to the network homepage. |
| 2. Network Selection Panel | This panel allows users to choose from different networks. |
| 3. Create a New Network Button | Click this button to start creating your own network. |
| 4. Settings Icon | Access all the devices linked to your account and manage your settings here. |
| 5. Notification Button | Click or tap this button to view alerts, messages, or updates. |
| 6. Network Account Profile | This section allows you to: – Edit your profile – Change your password – Switch networks – Access the support page – Sign out of your account |
| 7. Find a Network Feature | Use this feature to search for and discover business networks that match your interests and professional goals. |
| 8. All Network Filter | View a list of all the networks you have joined. You can filter the feed to display only specific network updates. |
| 9. All Person Filter | See posts from all network members within the networks you have joined. This filter allows you to view content shared by specific members. |
| 10. All Types Filter | Use this filter to display posts based on content type, including text, video, and images, from a specific person or network. |
| 11. Share a Post Button | Click this button to share a post within a specific network or across all networks you belong to. Features include: – Selecting the networks where your post will be visible – Enabling or disabling comments – Uploading photos or videos with your content |
| 12. Post Settings | This section allows you to: – Report a specific post – Mute the post’s author |
| 13. Clap Icon | Click this icon to show appreciation for a post shared by a network member. |
| 14. Pinned Post Icon | Indicates that a post has been pinned by the network owner for greater visibility. |
Network Dashboard (Desktop View)
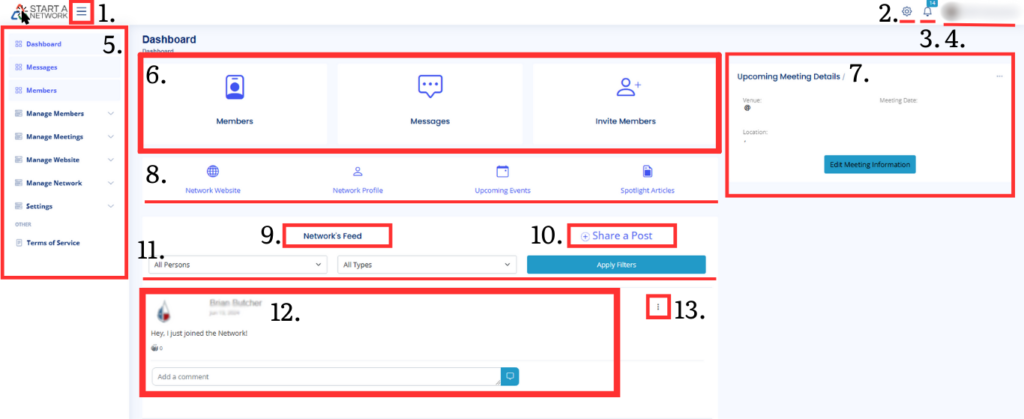
| Mouse Icon: Network Homepage | Click this button to be redirected to the network homepage. |
| 1. Hamburger Button | Once clicked, this icon will expand and display the sidebar menu. To hide the sidebar menu, simply click it again. |
| 2. Dashboard Settings | Access all the devices linked to your account and manage your settings here. |
| 3. Dashboard Notification Button | Click or tap this button to view alerts, messages, or updates within a specific network. |
| 4. Dashboard Profile | This section allows you to: Edit your profile Change your password Switch networks Access the support page Sign out of your account |
| 5. Dashboard Sidebar Menu | This sidebar menu changes depending on whether you are a network owner or a network member of a specific network you have joined. |
| 6. Dashboard Center Tile Menu | This displays the three most important tiles of your network. |
| 7. Upcoming Meeting Details | All approved meetings within the network will be displayed here, including venue details, meeting date, and location. |
| 8. Dashboard Shortcuts Menu | Shortcut icons are especially useful on mobile devices since they are the first elements you see. |
| 9. Network Feed | Here, you can see all the posts shared by network members. |
| 10. Share a Post | Click this button to share a post within a specific network. Features include: Selecting the networks where your post will be visible Enabling or disabling comments Uploading photos or videos with your content |
| 11. Activity Feed Filter Bar | Use this filter to display posts based on content type (text, video, or images) or from a specific person within the network. |
| 12. Network Member Post | Here, you can see who posted content within the network, including the username, date of posting, content description, clap icon, and share button for engagement. |
| 13. Share Post Settings | For network owners: Pin a specific shared post on your feed, even if posted by a network member Remove any post, whether you posted it or not Report a specific post Mute a specific author For network members: Edit or delete your own posts |
Network Dashboard (Phone View)
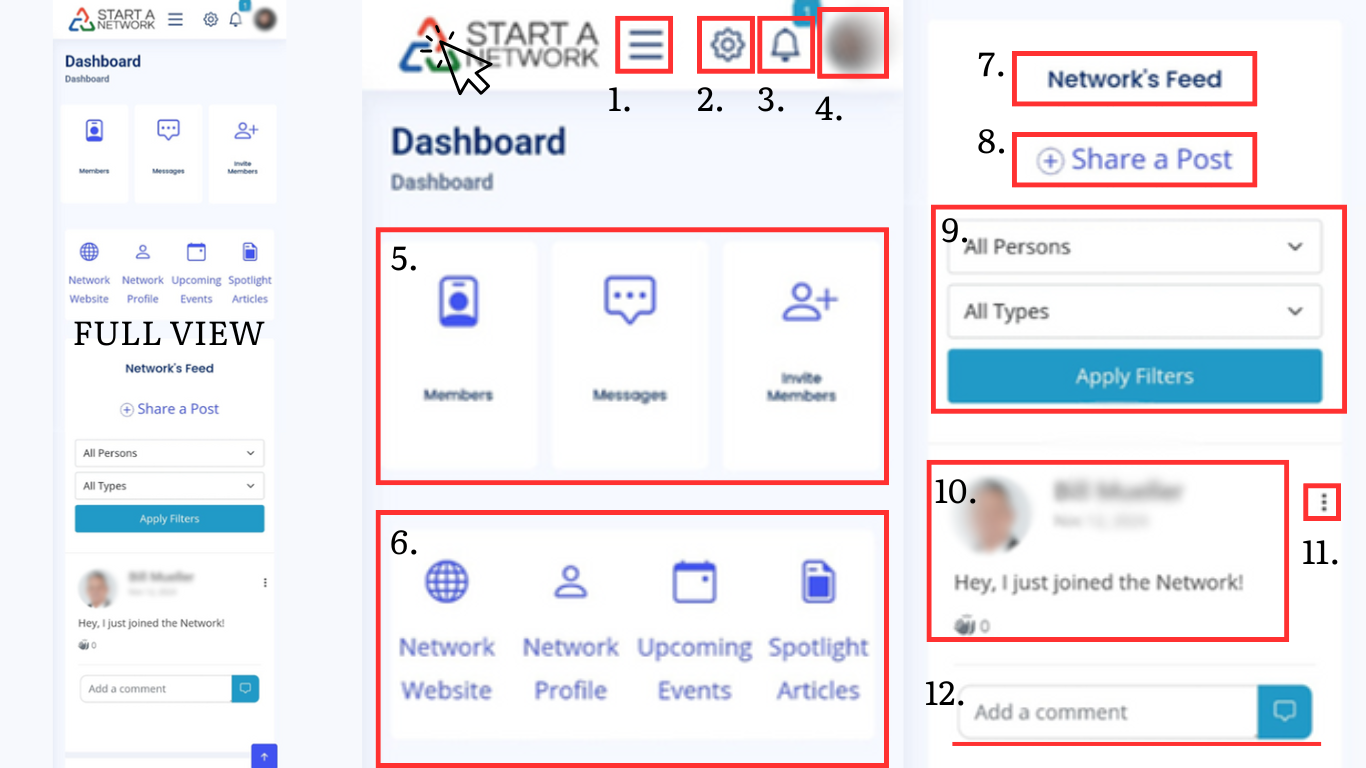
| Mouse Icon: Network Homepage | Click this button to be redirected to the network homepage. |
| 1. Hamburger Button | Once clicked, this icon will expand and display the sidebar menu. To hide the sidebar menu, simply click it again. |
| 2. Dashboard Settings | Access all the devices linked to your account and manage your settings here. |
| 3. Dashboard Notification Button | Click or tap this button to view alerts, messages, or updates within a specific network. |
| 4. Dashboard Profile | This section allows you to: Edit your profile Change your password Switch networks Access the support page Sign out of your account |
| 5. Dashboard Center Tile Menu | This displays the three most important tiles of your network. |
| 6. Dashboard Shortcuts Menu | Shortcut icons are especially useful on mobile devices since they are the first elements you see. |
| 7. Network Feed | Here, you can see all the posts shared by network members. |
| 8. Share a Post | Click this button to share a post within a specific network. Features include: Selecting the networks where your post will be visible Enabling or disabling comments Uploading photos or videos with your content |
| 9. Activity Feed Filter Bar | Use this filter to display posts based on content type (text, video, or images) or from a specific person within the network. |
| 10. Network Member Post | Here, you can see who posted content within the network, including the username, date of posting, content description, clap icon, and share button for engagement. |
| 11. Share Post Settings | For network owners: Pin a specific shared post on your feed, even if posted by a network member Remove any post, whether you posted it or not Report a specific post Mute a specific author For network members: Edit or delete your own posts |
| 12. Add a comment | In this section you add your insight or comment on a specific post of a member within the network. |
Network Website
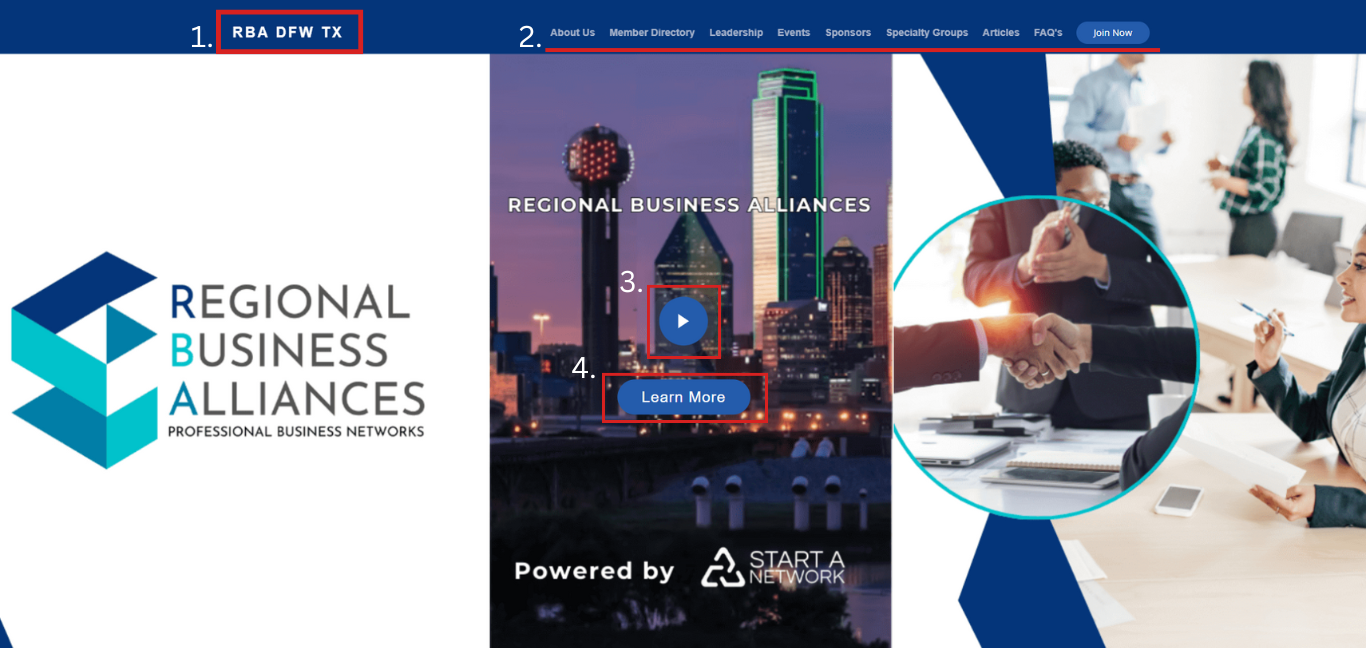
| 1. Network Name | Every time you click on this, you will be brought back to the network website page. |
| 2. Top Menu | This is the top menu that you can customize on your own by simply accessing the network dashboard > Manage Website > Website Settings > Navigation Settings. |
| 3. Play Button | This is where you can showcase a video about your network. All you need to do is paste a video link in the network dashboard > Manage Website > Website Settings > Website Content Settings > Hero Video URL. |
| 4. FAQ Button | Once you click this button, you will automatically be redirected to the FAQ section of the specific network website. |
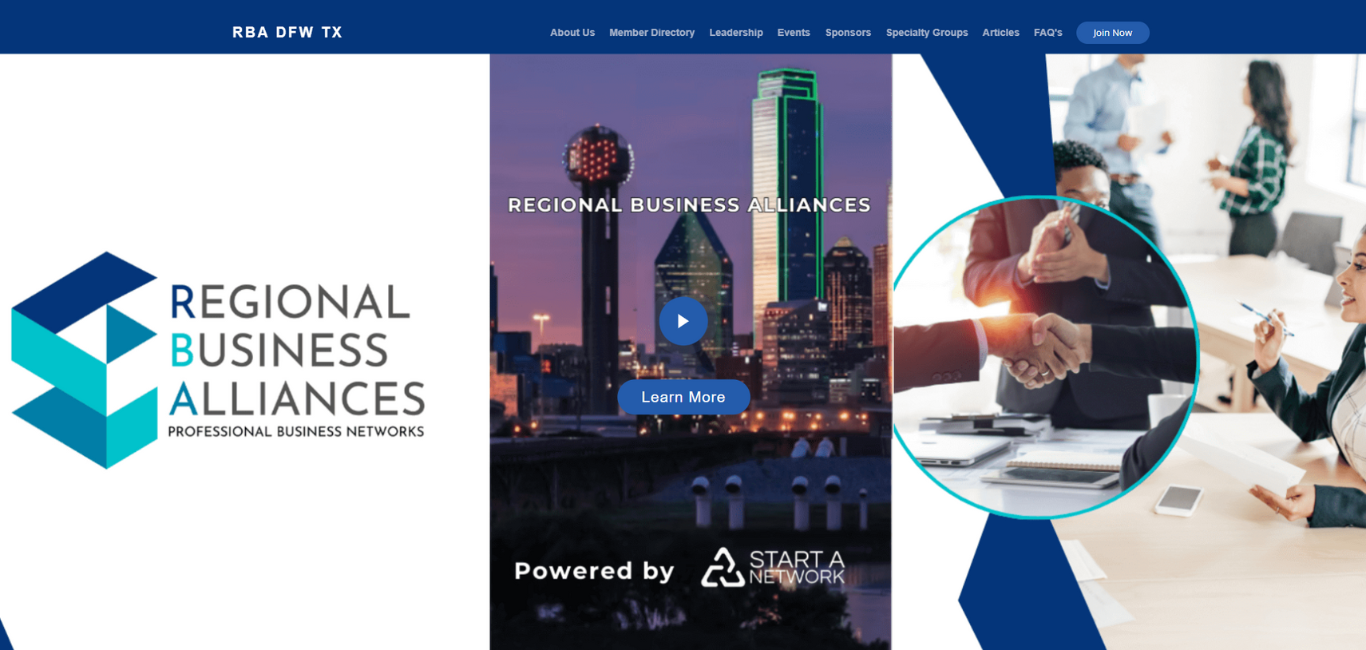
Network Website (Desktop View)
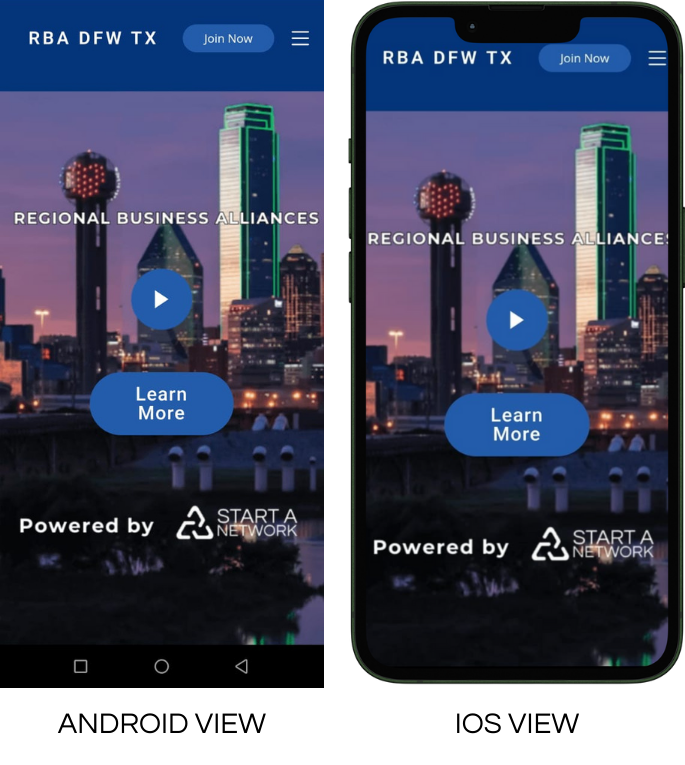
Network Website (Phone View)
CONTACT FORM
Do you have a question?
Our Contact Form is your direct line to StartANetwork! Whether you have questions, need assistance, or want to share feedback, we’re here to help.
We value your input and strive to provide the best support for building and growing your network. Let’s connect and collaborate to make your networking journey a success!